Control Tower v22.0.0 - Operations Guide
Version 21.1.0 |
Scroll |
Note: The Item reference numbers in the document are from the BluJay Solutions Control Tower issue tracking system and are intended for use by BluJay Solutions Support.
Feature Enhancements
Item Ref. |
Summary |
|||||||||
|---|---|---|---|---|---|---|---|---|---|---|
KCT-14214 |
Restriction of P.O./T.O Dynamic Screen Access
What’s Existing: Multiple users belonging to the same Company Relation were able to access a P.O/T.O without any restriction. Saving the P.O./T.O at the same time was causing duplication of shipment records.
What’s New: Now, the concurrent access of a P.O./T.O has been restricted, i.e., a job that is being accessed by a user cannot be accessed by another user of the same process.
Summary: When multiple users with different relations or proxy users or secondary process users try to access a P.O./T.O. at the same time, the user who opens the P.O./T.O. first will have access to edit and a message “Transaction in use” will be displayed to the rest of the users.
Concurrent Process: Different users belonging to different process steps (concurrent process) can access a P.O/T.O without any restriction, i.e., the message “Transaction in use” will not be displayed. When different users within the same concurrent process try to access a P.O/T.O transaction, the system displays a message “Transaction in use”.
Secondary Process: When a user tries to access a P.O/T.O through Secondary process: •If the same transaction is already being accessed by another user, then system displays a message "Transaction is use". •If the transaction is not being accessed by any other user, then dynamic screen will be opened to proceed with the transaction.
User Access: When same user logs into application through multiple sessions (using different browsers) and tries to access the same shipment, the system doesn’t display any message to restrict the access. If a different user tries to open the shipment through multiple sessions, then the system displays a message “Transaction in use”. When a user clicks Home or any other menu option without closing (save/submit) the transaction, the transaction will still be locked and cannot be accessed by other users.
Multi-Shipment Update: In case of multi-shipment update, if any one or more than one of the P.O(s)/T.O(s) is/are already in use by another user, then the system displays the following message when user selects and clicks on quick link from the drop-down list available on to do list. "P.O/T.O XXXXXX, XXXXXX is/are being accessed by another user, please deselect the same to continue." “XXXXXX” in the message indicates P.O Ref./PO No./T.O Ref./T.O No.
Note: This is applicable only when a P.O/T.O is accessed from to do list.
Session Time Out: When a P.O/T.O that is being accessed by a user is closed due to session time out, the same P.O/T.O can be accessed by another user without any restriction.
Track & Trace: When a transaction that is being accessed by a user is tried to access by a different user of same relation through Track & Trace > New search or Global search or Docket list, the user will be navigated to T&T screens (by default to Header screen of P.O/T.O) instead of the dynamic screen. The system displays a message "Transaction in use, you are navigated to T&T screen" before navigating to T&T screen.
P.O Dispatch/Add T.O Item (Based on P.O Item Conf.): When a user tries to dispatch a P.O Conf./Item that is being accessed by another user, then system alerts the user by displaying the message "The P.O XXXXXXX (P.O Ref/P.O No.) you are trying to dispatch is in use, not allowed to dispatch". This is applicable to all P.O dispatch menu options and Add Item/Conf. in T.O Item.
Import Update: This enhancement doesn’t have any impact on the import update, i.e., when an import XML is received while accessing a P.O/T.O, the data of the P.O/T.O will be updated without any restrictions.
|
|||||||||
KCT-15871 |
Increase in Length of Service Level Code
What’s Existing: The current service level code in service level master is limited to 4 characters. This was causing import failures of TransportOrders with service level code of more than 4 characters.
What’s New: The length of service level code has been increased to 25 characters to prevent the import failures.
Summary: Static Lookup > Service Code New and Edit screens now allow users to enter maximum of 25 characters of Service Code when Properties file EXTERNAL_SYSTEM_FORMAT is set as standard or any other value that doesn’t include KEF. The screens allow users to enter maximum of 10 characters when Properties file EXTERNAL_SYSTEM_FORMAT is set as KEF.
Now, service level master on the Article screen properly displays the data of selected/imported service level. While creating service level master record through static import or manually, the system doesn’t accept more than 25 characters of service level code. When user uploads an excel with data, the system checks the uploaded file based on External System Format value to validate the XML. The field lengths are validated as per XSD being used. When a T.O XML is imported with service level code within 25 characters limit, the code will be inserted successfully. If the service level code is beyond the limit, it will be moved to Conversion folder. If the value entered is not matched with any value that is part of service level master, then the XML will pass but the value will not be populated on T.O. When maximum length data is exported from Control Tower (25 characters) and it is not supported by external system, the value will be trimmed to the maximum value of external system in WSO2.
The following changes have been done to reflect the update:
Database Changes tblTransportOrderVarious > ServiceLevel - Length has been increased to Varchar(25)
XSD Changes Article, TOExport & TOImport XSDs – ServiceLevel length has been increased to 25 chars. Article_TMFF, TOExport_KEF & TOImport_KEF XSDs – ServiceLevel length has been increased to 10 chars.
|
|||||||||
KCT-16290 |
XML Payload for User Import
What’s New: When a P.O/T.O/CO is failed to be processed, a copy of the XML is now sent in the error XML email. This helps in easy identification of the issue and can also be used to modify and resend to fix the issue.
Summary: When a user XML is imported through web service or XML import (FTP path), and it is failed due to tag or data error, then the XML will be moved to Conversion or Quarantine folders. •The XML will be moved to Conversion folder when it is not inline with XSD. In this case, an email will be triggered with a copy of failed XML. •The XML will be moved to Quarantine folder when its import process is failed due to data error. In this case, an email will be triggered with two attachments i.e., the complete XML from Archive folder and the quarantine XML part stating the problem tags. This process is same for P.O/T.O/CO XML when moved to Quarantine folder. |
|||||||||
KCT-16391 |
Workflow Duplication Fixes
What’s Existing: Earlier, when a P.O/T.O profile workflow was duplicated, the following items were not copied on to new workflow: 1.Import Criteria QL 2.Workprofile Item a.Import Criteria b.Profile Item Details-Due Date configurations c.References
What’s New: Users are now successfully able to duplicate workflows (T.O/P.O) with below configurations along with the regular workflow configuration: 1.Import Criteria QL 2.Workprofile Item a.Import Criteria b.Profile Item Details-Due Date configurations c.References When a workflow is duplicated, the default name of the new workflow will be Workflow-DBID (Eg: Workflow-112). |
|||||||||
KCT-16523 |
Company Name and Role on Company Relation Quick Links
What’s Existing: While navigating to quick links of company relation, an Admin user needs to remember the relation that is being accessed to set necessary configurations. If not, the user needs to go back to Details page to check the details.
What’s New: To make the Admin’s job easy, the company relation and role that is being accessed is now displayed on the quick links of the company relation as mentioned below. COMPANY RELATION - ADDITIONAL PARTIES (Admin Company - Admin) |
|||||||||
KCT-16763 |
Party Assignment When XML is Imported
What’s New: When a P.O./T.O. XML is imported or P.O./T.O excel is uploaded for the first time, the system checks for the Party Assignment party type and automatically adds it to the P.O/T.O. Party Assignments are considered only when P.O/T.O XML is imported or excel is uploaded for the first time. When an update is received for a P.O/T.O through XML import or excel upload, the system overwrites the Party assignment party type with the party type received through the XML/excel.
1.Without Protect Party Type (P.O.) and Control Import (T.O.) configurations a.When a P.O/T.O update is received with same parties as in NEW •For P.O - Parties sent in update XML will only remain; the ones added through party assignment will not be available against transaction if the same party types are not sent in the update. •For T.O - If same parties as in New XML are imported in update XML, system will retain the parties added through party assignment. b.When a P.O/T.O update is received with party type which is already added through party assignment: •For P.O - Parties received in XML will be added. •For T.O - Parties received in XML will be added and the party assignment party will be ignored if the same is received in XML. 2.With additional configurations (P.O - Protect Party Types, T.O - Control Import) a.When a P.O is imported for the first time. •There won’t be any validation for both P.O & T.O and all parties imported along with party assignment will be added to P.O & T.O. b.When an update is received with same parties as in new XML •For P.O - All parties in XML and protected party types will be available against P.O. •For T.O - All parties in XML and party assignment parties will be available against T.O. c.When an update is received with party type added through party assignment •For P.O - Protected party will not update even when a new one is received in XML. •For T.O - Party if not configured to update will not be updated. |
|||||||||
KCT-16954 |
CT-DM Confidential Flag Integration
What’s New: Now, Control Tower supports a functionality of Document Manager, i.e., securing the documents by marking them as confidential. This feature limits the visibility of the confidential documents to only those users who have access privileges to the documents.
Summary: The following changes have been done in Control Tower to enable the transfer of confidential documents between products and parties when DM integration is enabled with Control Tower.
“Kewill_Imaging_Integration” system parameter enhancements: The system parameter "Kewill_Imaging_Integration" has been renamed to "DM_Integration". Earlier, the URL, Username and Password details were maintained in system parameter. With this new enhancement, the details are moved to properties file.
Sample DM_URL = http://internal-QA4-doc-lb-1379225037.us-east-1.elb.amazonaws.com:8081/ki/ImageRest/imagingService
•DM_PrivilegeUsername/Password = XXXXXXXX •DM_UnprivilegeUsername/Password = XXXXXXXXX •Confidential = 0/1 (0 - Nonconfidential, 1 - Confidential) •DM_WorkQueue = CT
The Description of the system parameter has been updated as below: “Set this parameter as Y when DM is part of the integration. All the documents will be saved in DM. Set this parameter as N when DM is not part of the integration. All the documents will be saved in CT”.
Configurable Options on Setup and Operational screens: When Control Tower is integrated with Document Manager, the "DM_Integration" system parameter needs to be set to “Y” to support the confidential document functionality. When the system parameter is set to “Y”, few newly added configurable options will be enabled on the following screens: 1.Setup screen(s) •COMPANY RELATION screen •USER/NEW USER screen 2.Operation screen(s) •File Share screen
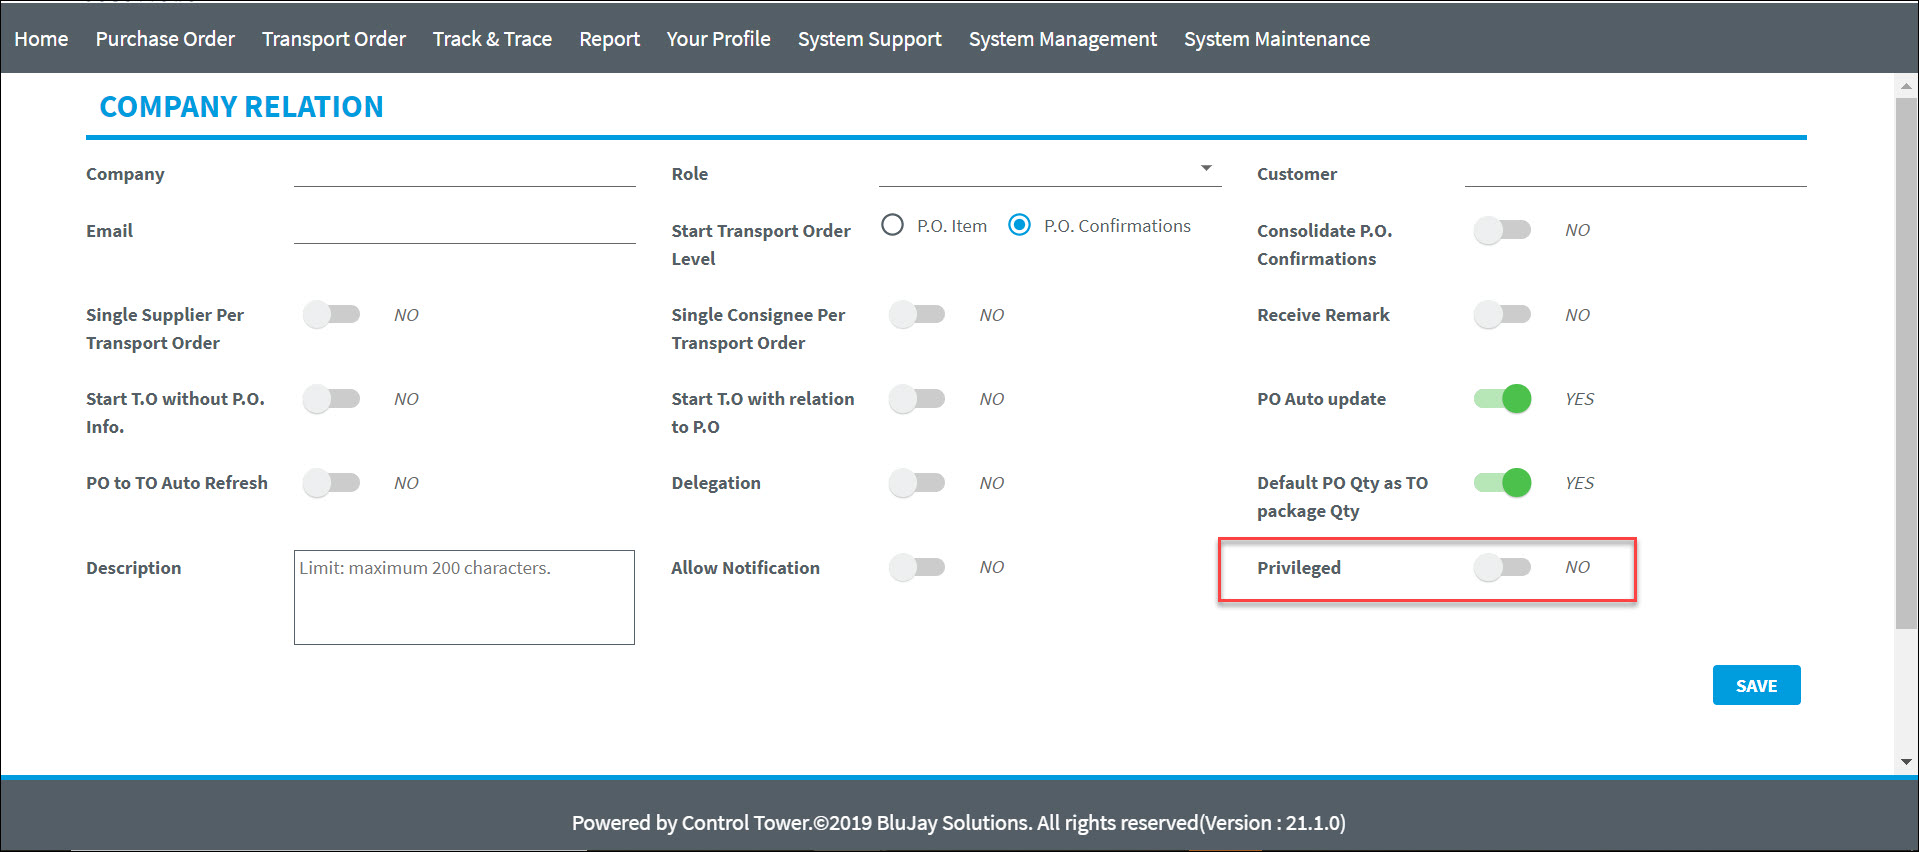
On COMPANY RELATION screen, Privileged toggle switch is added to configure a default setting while creating new users belong to the same Company Relation. The default option for the toggle switch is set to NO.
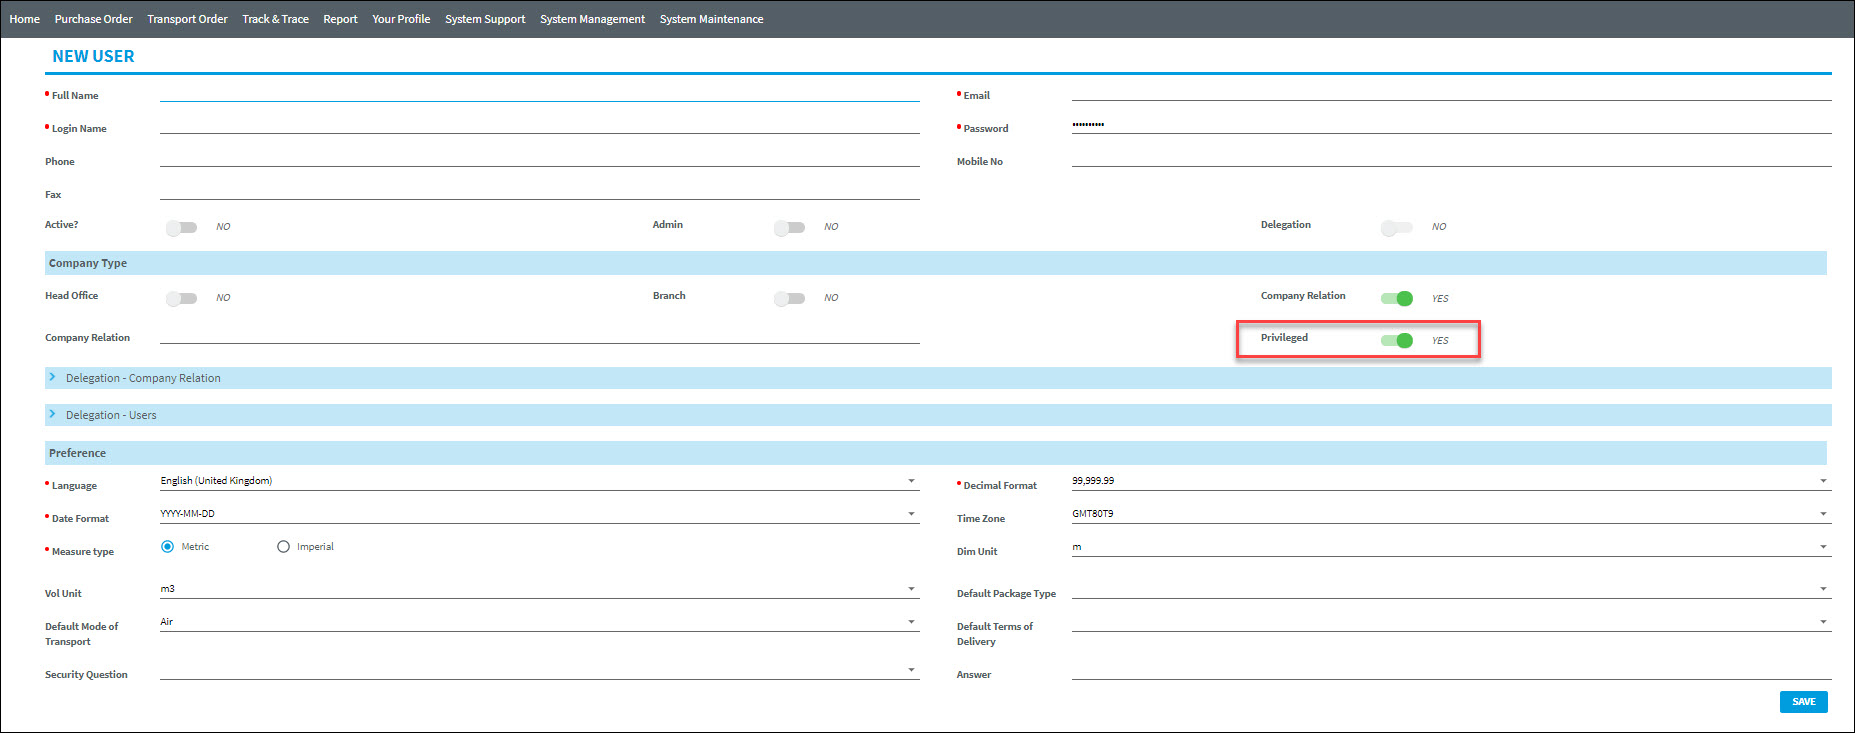
On NEW USER/USER screens, Privileged toggle switch is added to configure privileged setting against a user. The default option for the toggle switch is set to NO.
•The radio button will be enabled only when Company Relation toggle switch is enabled, and Company Relation field is not null on the USER creation screen. •If the toggle switch is set to YES, user can access confidential documents. •If the toggle switch is set to NO, user cannot access confidential documents.
User import XML has been enhanced by adding "Privileged” tag as optional. When the import XML is received without any value in the tag, the system takes the default value as No.
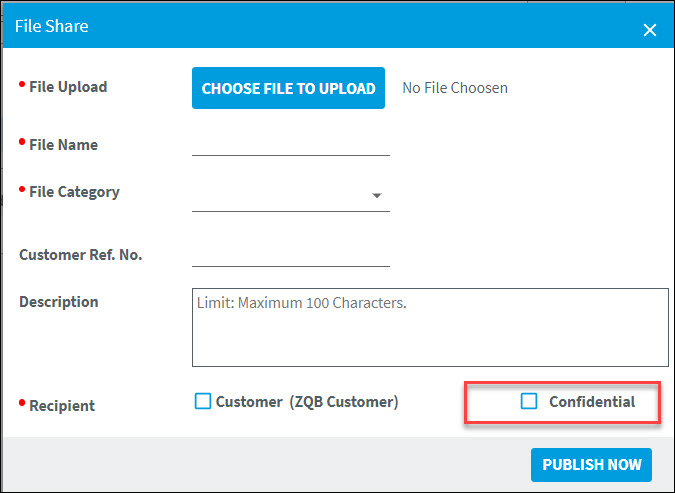
On File Share screen, Confidential check box is added, and user can select or clear it prior to uploading a document. The check box option is available to all users irrespective of the Privileged user setting on USER screen.
Relation and User Level Access: An operational user can remove, download and email a selected document under File Share QL. The user can remove and download a selected document under Import Document QL. To perform these actions against a document, a user should meet the below accessibility conditions.
When the above-mentioned accessibility conditions are met, only privileged users can access the confidential documents and perform the associated tasks.
Multiple Documents Scenario: The system checks for the user level privileges. •If Privileged User = YES, then confidential and normal documents are displayed with check boxes to select or clear them. •If Privileged User = NO, then only normal documents are displayed with check boxes to select or clear them. |
|||||||||
KCT-17051 |
Auto Addition of Newly Created Party to Transaction
What’s Existing: When a party was created on fly (using CREATE NEW option on party dynamic screen), user had to reselect the party to make it available against transaction.
What’s New Enhanced the system to auto add a party that is newly created on the fly to transaction instead of asking user to select it to add to the transaction.
Summary: [SAVE] and [CANCEL] buttons on CREATE NEW screen have been removed. Now, user can save or cancel a party using the relevant buttons available on Parties screen (bottom right). When user clicks on [SAVE] or [CANCEL] buttons to save or cancel a party, the pop-up window will be automatically closed. [CREATE NEW] and [REMOVE] buttons are now disabled on CREATE NEW > Company screen. When user clicks on Parties bread crumb link (top left corner), the user will be navigated back to Parties screen and all the buttons available on the screen will be enabled. |
|||||||||
KCT-17055 |
Email ID Validation Enhancement
What’s Existing: On Forgot Password screen, Email address validation was case sensitive, i.e., user had to enter the same Email ID that was recorded on the user table.
What’s New: Now, the Email address on Forgot Password screen is case insensitive.
Summary: When a user enters Email address on Forgot Password screen, the system validates it with the Email address in database for the given login name without distinguishing between upper and lowercase. Therefore, the system doesn’t throw any error in case of letter case (upper or lower) mismatch. When a leading or trailing space is added while entering the Email address, the system removes the space before validating it and doesn’t throw any error message for the added space. Please note that Login Name validation remains unchanged and it is case sensitive. The system throws an error message "Invalid login name or email address, please try again" in the following cases: •Invalid Email ID – When a user enters incorrect Email address with or without leading/trailing space •Invalid Login Name - When a user enters incorrect Login Name or enters the Login Name in the incorrect letter case |
|||||||||
KCT-17059 |
Support System Functions in Start Type Response Button
What’s New: Now, Control Tower can configure Start type response buttons by including PO Completed and TO Completed system functions in the response buttons.
|
|||||||||
KCT-17062 |
Support Request Link Control
What’s New: Support request option under My Account drop-down list is now made configurable.
Summary: A new system parameter "Disable_support_request" has been introduced to make the Support request option configurable. •If the system parameter is set to ‘Y’, the Support request option will not be shown in the My Account drop-down list. •If the system parameter is set to ‘N’, user can see the Support request option in the My Account drop-down list. The system parameter “Disable_support_request” is set to ‘N’ by default. |
|||||||||
KCT-17094 |
New UI for T.O Create Screen Pop-up
What’s New: UI layout of the T.O. create screen pop-up window has been enhanced as per new UI standards.
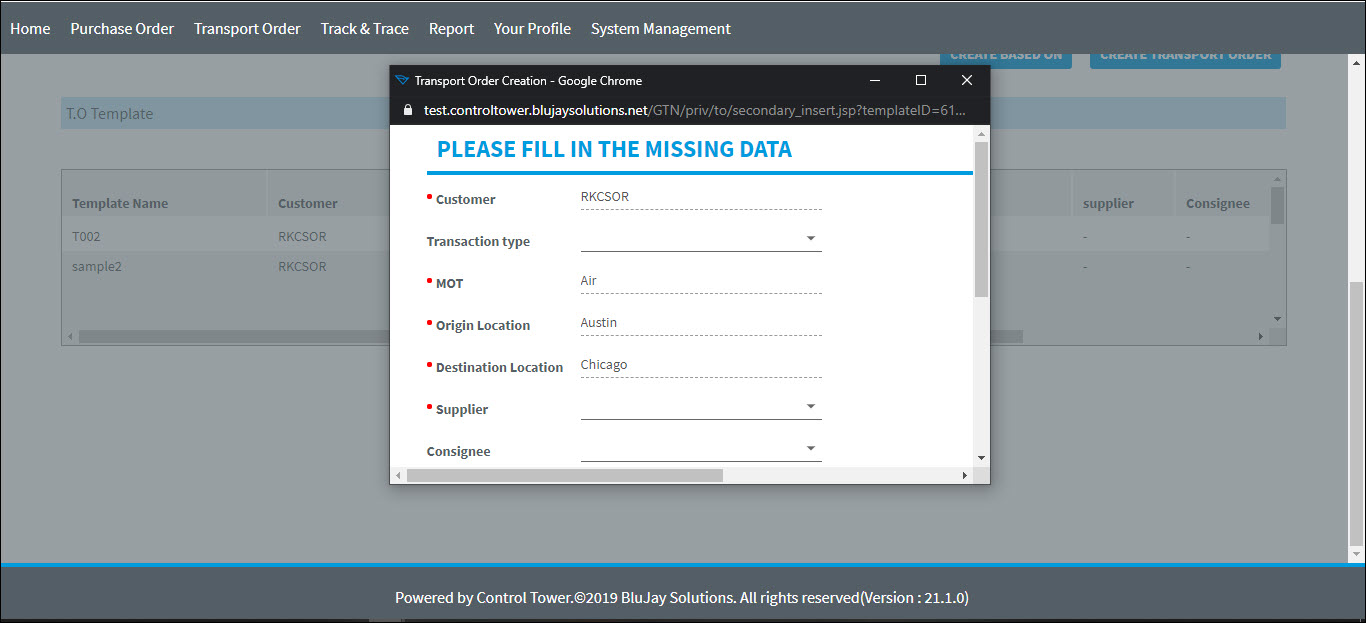
Summary: The UI layout of the pop-up window has been enhanced as shown in the below screenshot:
The pop-up window will be opened when a user clicks on a template without filling all the mandatory fields while creating a Transport Order The pop-up window will be opened:
1.When MOT value is not selected in T.O screen and it is also not available in the selected template. 2.When Origin Location is not selected in T.O screen and it is not available in the selected template as well. 3.When Destination Location is not selected in T.O screen and it is also not available in the selected template.
The pop-up window will be opened in the below specific scenarios with respect to the "TO_Create_Screen_Fields_Action" system parameter value:
Note: The system parameter value has 7 digits, where “M” in the value indicates mandatory and “O” indicates optional.
4.When the 1st digit of the system parameter value is "M" and Transaction Type value is not selected in T.O screen and it is also not available in the selected template. 5.When the 2nd digit of the system parameter value is "M" and Shipper value is not selected in T.O screen and it is also not available in the selected template. 6.When the 3rd digit of the system parameter value is "M" and Consignee value is not selected in T.O screen and it is also not available in the selected template. 7.When the 4th digit of the system parameter value is "M" and Requested ETD value is not selected in T.O screen. 8.When the 5th digit of the system parameter value is "M" and Requested ETA value is not selected in T.O screen. 9.When the 6th digit of the system parameter value is "M" and Business Unit value is not selected in T.O screen and it is also not available in the selected template. 10.When the 7th digit of the system parameter value is "M" and Job Type value is not selected in T.O screen and it is also not available in the selected template. |
Dropped Features
Item Ref. |
|
|---|---|
KCT-17078 |
Removed Performance Sub-module from Reports Menu Performance sub-module (Report > Performance) and its options (listed below) have been removed from Reports menu and users cannot access these menu options anymore. •Report > Performance > Discrepancy Report •Report > Performance > Milestone Evaluation •Report > Performance > Milestone Exception Report •Report > Performance > Overall Performance •Report > Performance > Process Performance •Report > Performance > Supplier Performance |
Bug Fixes
Item Ref. |
Summary |
|---|---|
KCT-16819
|
Issue: T.O Public Track and Trace Container screen was showing wrong description for Second container, Size/Type, Seal No and Actual Location fields.
Solution: Improper phrase codes that caused the issue are fixed, and the label descriptions are now properly displayed.
|
KCT-16990 |
Issue: Email alerts were not being triggered as expected.
Solution: New schedule job mediator changes have been done to handle alerts in database. Alerts are now being triggered as expected. |
KCT-17018 |
Issue: Performance issues were observed with the following screens: System maintenance > System > Module/screen > Manage Module/Screen System maintenance > System > Module/screen > Security Settings
Solution: The UI layouts of Manage Module/Screen and Security Settings screens have been revised as per latest UI standards to optimize the performance issues.
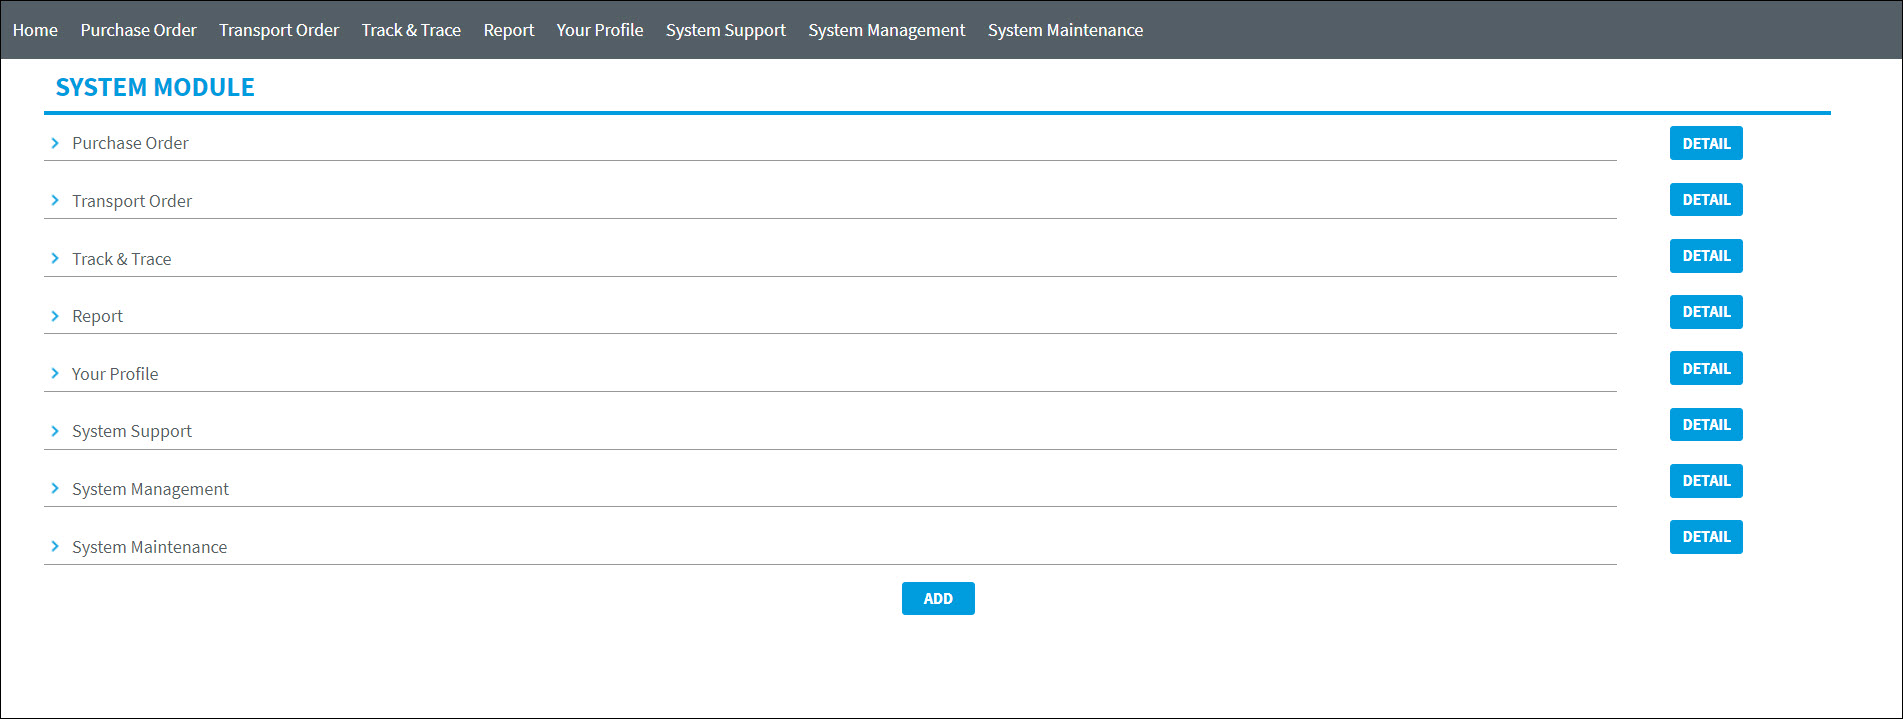
Manage Module/Screen: 1.On selecting Manage Module/Screen, a screen appears as shown in the figure below.
2.The list of Main modules (Level 1), sub-modules (Level 2 & Level 3) under main modules and screens (Level 4) for each function of those sub-modules can be added or removed from this screen. 3.Expand the top-level modules to see the next level of modules/sub-modules. 4.To view the details of a module/sub-module, click [DETAIL] against the relevant module. 5.To modify the details of a module/sub-module/screen, click [DETAIL]. A pop-up window appears on the screen. Modify the details and click [SAVE] to update the modifications. 6.To remove a module/sub-module/screen, click [DETAIL] against the module/sub-module/screen you want to remove. A pop-up window appears on the screen. Click [REMOVE]. Any module/sub-module cannot be removed unless its associated sub-modules/screens are removed. 7.To add a main module (Level 1), click [ADD] at the bottom-center of the screen (below the list of modules). A pop-up screen appears to enter the module details. Fill the details and click [SAVE]. 8.To add a System Module under Level 1 & Level 2, click [ADD] against the module/sub-module you want to add under. A pop-up screen appears to enter the system module details. Fill the details and click [SAVE].
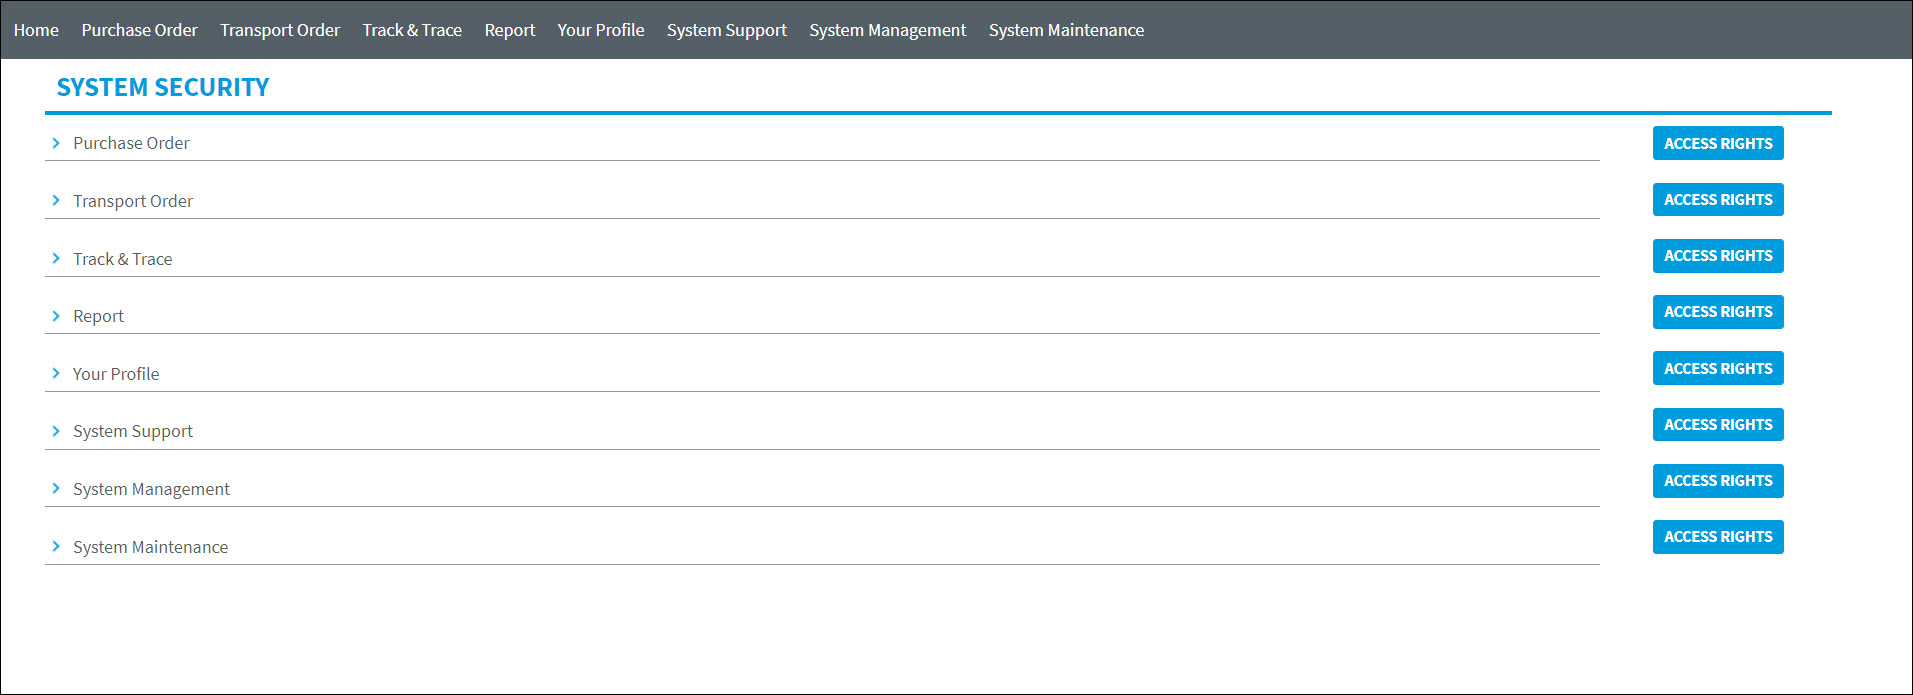
Security Settings: 1.On selecting Security Settings, a screen appears as shown in the figure below.
2.Expand the top-level modules to see the next level of modules/sub-modules. 3.The access must be granted at specific levels, i.e., granting access to a main-module doesn't allow users to access its sub-modules. The access has to be granted for sub-modules/screens as well. 4.To grant access to a module/sub-module: a.Click [ACCESS RIGHTS] against the module/sub-module you want to grant access to. A pop-window appears on the screen. b.Select the role/role category/user check box from the list, and click [ADD]. c.To search and add a particular role/role category/user, click [ADD] without selecting any default check boxes. Expand the [Search] panel on the next screen. Enter the details and click [SEARCH]. d.Select the role/role category/user check box from the search results list and click [ADD]. 5.To remove access permission to a module/sub-module: a.Click [ACCESS RIGHTS] against the module/sub-module you want to remove access to. A pop-window appears on the screen. b.Select the role/role category/user check box from the list, and click [REMOVE]. |
KCT-17154 |
Issue: Visual milestone map was not properly displayed when a user tried to view milestones.
Solution: The issue has been fixed and now the visual milestone map is properly displayed. |
KCT-17203 |
Issue: Last Login information was not shown correctly in the user table screen.
Solution: This is fixed and now user last login date & time details are accurately shown in the user table screen. |
KCT-17209 |
Issue: When the system paremeter “pwdSendMailWithNewUserData” was set to ‘N’, Welcome emails were being triggered to the added customers.
Solution: User Import XML has been updated with respect to “pwdSendMailWithNewUserData” system parameter. Welcome emails will not be triggered anymore when the system parameter is set to ‘N’. |
KCT-17228 |
Issue: Files were not getting deleted from the source path for Control Tower Standalone instance for static imports.
Solution: The issue has been fixed and now the files are getting deleted from source path after successful processing.
|
